KOSHER RECIPES FOR GLUTEN-FREE LIVING


Sunday, September 02, 2007

My Famous Herbed New Potato Salad with Green Beans


We all have recipes that have become legendary in our families or our communities. The cake you made 5 years ago that your mother still raves about to all your relatives. The quinoa salad people ask you how to make on a regular basis. The grilled flank steak that your entire circle of friends ask you to cook every time there's a BBQ. The kugel you brought to the synagogue seder one year that people now expect you to make each and every year.

My own "famous" recipes (here in the off-line world, that is) are my Passover nut loaf, which I haven't yet posted here because it is still classified as Top Secret; my potato latkes; and my "German" potato salad which I've made for numerous BBQ's and potlucks over the years. Being that it's not really so German at all, I've decided this is as good an opportunity as ever to re-christen it with a more accurate and gourmet-sounding name. So allow me to introduce you to my Herbed New Potato Salad with Green Beans. It is inspired by the potato salad my dad made for us when I was growing up. It is best served slightly warm or at room temperature, but tastes fabulous cold as well. The leftovers are fantastic. It is mayonnaise-free... vegans, mayo-haters and cholesterol-watchers rejoice! I like it a whole lot, and I hope you do, too.

Tell me: What is your "famous recipe"?


HERBED NEW POTATO SALAD WITH GREEN BEANS

[ Gluten-Free / Dairy-Free / Nut-Free / Soy-Free /
Pareve / Vegan ]


2 1/2 lbs small red new potatoes
2 Tbsp salt
2 1/2 cups green beans, cut in thirds
1/4 cup minced fresh chives
3 Tbsp minced fresh dill
Minced fresh flat-leaf parsley to taste
3 Tbsp dijon mustard
3 Tbsp apple cider vinegar
1/2 cup extra-virgin olive oil
1 large shallot, minced
1 tsp agave nectar or sugar
1 tsp ground black pepper

In a large pot, place well-scrubbed whole potatoes. Cover with water by several inches, and add 2 Tbsp salt. Bring to a boil, then reduce heat to medium-low and simmer until the potatoes are tender without being mushy. Do not turn heat off, but transfer potatoes into a colander immediately, and rinse with cold water. Allow to cool just until they are warm but can be comfortably handled. While the potatoes are cooling, turn the heat up under the pot of water and add green beans. Cook uncovered for just a few minutes, until green beans are tender but still crisp and bright. Remove from water and drain. If you want to retain the brightness of their color, submerge them immediately in ice-water until cooled. Add beans to the large bowl that contains dressing.

Cut warm potatoes into 1 1/2-inch pieces (quarters or eighths depending on size of potatoes). Add them to the rest of the ingredients, sprinkle with the fresh herbs, and toss very gently to combine, stirring from the bottom to coat potatoes and beans with the dressing. Allow to sit for 20 minutes before serving. Garnish with additional chopped herbs if desired. Serve while still warm, or at room temperature.

Baking for Bette: Sorghum Bread

When Seamaiden of Book of Yum announced a blogging event to pay tribute to the life of gluten-free baking pioneer Bette Hagman, I knew I wanted to participate. Bette passed away this month, after a long life as a successful gluten-free cookbook author who brought bread (and cake, and pizza, and cookies, and....) back into the life of many many people with celiac disease and gluten intolerance who thought they would never eat their favorite comfort foods again.

Confession: I own two of Bette's gluten-free cookbooks but I haven't cooked a single recipe from them. I figured now was a good time to finally try one of the recipes, but on the day I planned to pull them off the shelf and bake something, I discovered that - alas - the books were not on my bookshelf. They are apparently still in a box in my storage space, probably buried under many other boxes. So I scoured the internet to see if there were any of her recipes I could find online. The first one that I found called out to me: Sorghum Bread, a recipe Bette created for gluten-free sorghum flour purveyors Twin Valley Mills. Sorghum is by far my favorite GF flour - It is mild and finely ground and sweet, with no unusual flavor or grittiness. It is a whole grain, yet has the appearance and texture of one of the more refined flours. It works in nearly every recipe and I've been using it more and more as a replacement for white and brown rice flours. It is delicious! I served this bread with Shabbat dinner this week and all of the people at the table, several of whom have never tasted gluten-free bread, raved about it.

I changed some of the measurements and procedures for this recipe, adapting it to be kosher and pareve. I am posting my adapted version here, though I cannot take any credit for the recipe as a whole, as it's still definitely a Bette Hagman recipe. Because I rarely eat any refined sugar, the original recipe would have been far too sweet for me, so I reduced the amount of sugar. If you use a sweet non-dairy milk substitute such as Vance's DariFree Original Powder Beverage you should be able to get away with reducing the added sugar to 1 1/2 or even just 1 tablespoon. If you use unsweetened dairy milk powder or prefer a sweeter bread, you will want to use 2 tbsp of sugar.

The appearance and texture of this bread are just lovely. I can only imagine the work that Bette must have put into the chemistry experiment that is gluten-free baking in order to come up with just one recipe, let alone the hundreds she has published.

Bette, thank you for the contributions you made to the gluten-free world. Even though this is my first time preparing one of your recipes, I can feel the impact you have made on my life indirectly. If it weren't for you, I wouldn't have become gluten-free at a time when there were so many fabulous recipes available on the internet and in a plethora of cookbooks. If it weren't for you, I might not have had people to reassure me that I could still eat the foods I love. You were truly a pioneer, and every gluten-intolerant person's life is better for it. Rest in peace.


[We ate half of the loaf before I even got a chance to photograph it! Oops.]

PAREVE SORGHUM BREAD
An Adaptation of Bette Hagman's Recipe for Twin Valley Mills

[ Gluten-Free / Dairy-Free / Soy-Free / Pareve / Vegetarian Option ]


1 cup sweet sorghum flour
2/3 cup tapioca flour
2/3 cup cornstarch
1 3/4 tsp xanthan gum
1/3 cup Vance's Dari-Free or other powdered non-dairy milk substitute
1 tsp salt
1 tsp unflavored kosher fish gelatin or equivalent agar-agar (vegan gelatin substitute)
1 tsp gluten-free baking powder
1 1/2 Tbsp sugar
2 1/4 tsp dry quick-acting yeast granules
2 eggs
1/2 teaspoon distilled white vinegar
3 Tbsp vegetable oil
1 cup lukewarm water

Preheat oven to 375 F. Grease an 8 1/2" by 4 1/2" loaf pan with vegetable oil and dust with rice flour. When the oven gets to the right temperature, turn it OFF and do not open the door.

Combine all dry ingredients in a medium bowl. In a large bowl, or in the mixing bowl of a standing mixer, whisk the eggs, vinegar, and oil. You can use a sturdy electric hand-mixer, or a wooden spoon (if you have lots of elbow grease to spare) if you don't have a standing mixer. Add most of the water, saving a few tablespoons. Slowly fold in flour mixture a little at a time, with mixer on low setting. The mix should have the consistency of a thick cake batter. Add the remaining water to attain this texture. With the mixer on high, beat for several minutes or until the dough is smooth and well-blended.

Pour into the greased and floured pan, cover with a dishtowel and allow to rise in the warm oven for 30 minutes or until the dough reaches the top of the pan. Turn the oven back on to 375 F and bake for 10 minutes, then cover with tin foil and bake for another 40 to 45 minutes or until the crust is golden brown. Immediately remove from pan and allow to cool before slicing.

Sunday, August 26, 2007

Mission Possible: Jamaican-Style Spicy Turkey Patties

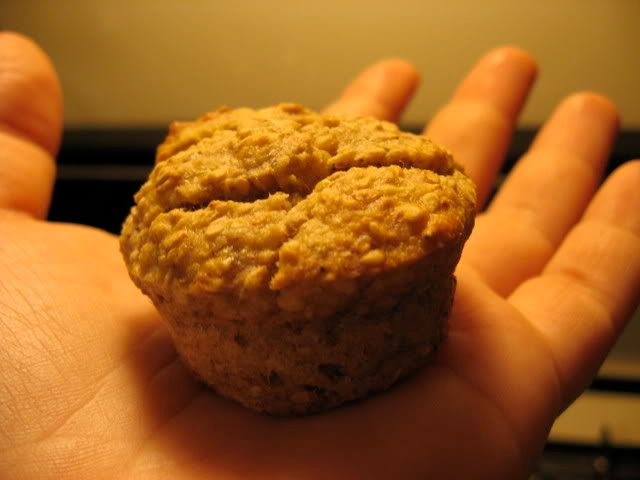
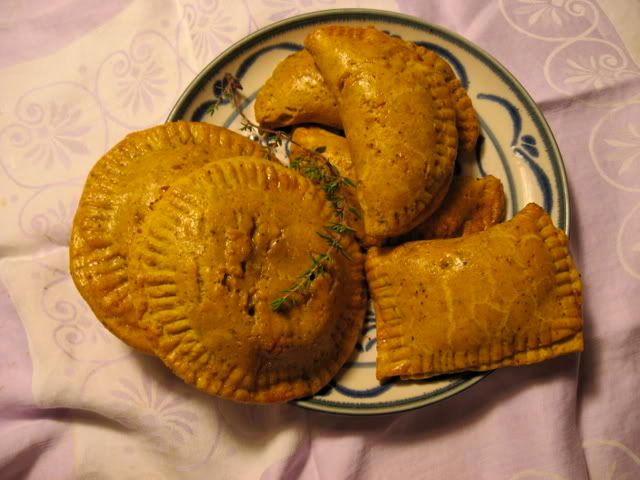
[Three different shapes!]

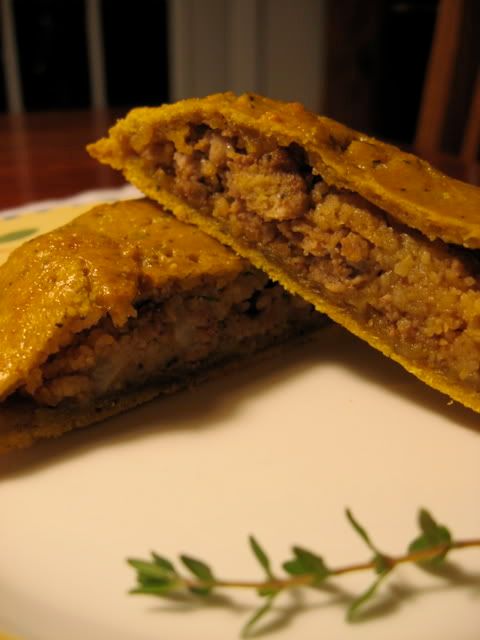
[Spicy meaty goodness!]

At the Ashby Flea Market in Berkeley, CA, there's a truck that sells Jamaican beef patties - Each patty a flaky, orange-hued pastry wrapped around moist, flavorful meat. A patty is a savory and convenient meal-in-a-pocket, a Jamaican knish, if you will. Though I haven't eaten them for years, walking by the truck at the flea market when I was living in the Bay Area always reminded me of the first time I tasted a beef patty as a kid. The flavors still stand out in my mind, so I knew that I wanted to try my hand at creating a kosher and gluten-free version of this Caribbean delicacy. I love how they turned out. They are definitely less greasy than the original, and with a dough that is chewy and full of flavor, rather than flaky and greasy. They were a big hit in my household.

Having an impossible time finding kosher beef around these parts, I opted for kosher ground turkey instead. If you use non-kosher meat keep in mind you may need to use more salt and will likely find that the meat gives off more moisture (which you can sop up with more bread crumbs, if necessary). Since kashrut precludes the use of the traditional lard in the dough, as well as the mixing of butter with meat, I chose solidified Spectrum Naturals coconut oil 
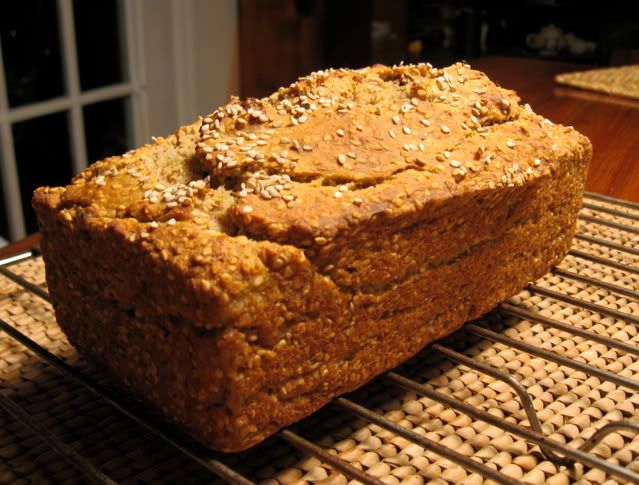
instead. Feel free to use margarine if you prefer. The crust is a simple Chebe mix prepared without the usual added cheese, and with some different ingredients mixed in for flavor, texture and color. I used Chebe Gluten-Free Pizza Crust Mix because it's what I had on hand, but you might try using the Chebe All-Purpose Gluten-Free Bread Mix adjusting liquid ingredients accordingly. [The Orthodox Union page has only four of their mixes listed, whereas on the Chebe site they have posted a copy of the letter certifying 6 of their products (all but one are pareve) but expiring in March, so if you only use hechshered kosher products, do make sure to check with them about which products actually are currently certified!]

For dry gluten-free bread crumbs, you can make your own by baking left-over bread slices on low-heat until they become completely dry and crumbly (I collect the ends of all my loaves in a ziploc bag in the freezer for this purpose) and then pulsing them in a food processor. Or make it easier on yourself and just purchase some pre-made gluten-free bread crumbs.

This recipe will leave you with a lot of the flavorful meat mixture left over - You may want to save it, as I did (try mixing it with rice, or turning it into a flavorful Shepherd's pie, or mixing it with your favorite soup) or you might choose to make a double-batch of the dough for twice the patties. Double the patties, double the fun! They will last a few days in the refrigerator, and heat up very well in the toaster oven or a regular oven. I do not recommend microwaving them.

Public service announcement: Don't forget to wear surgical gloves when you handle habanero or scotch bonnet peppers - Washing with soap is often not enough to remove the infernally hot oils from your skin. Be sure not to touch your eyes (or anywhere else sensitive), and immediately wash your cutting board thoroughly to avoid a spicy surprise at a later date. Not a fan of spicy foods? Use a little bit of dried cayenne or a minced jalapeno instead.

JAMAICAN-STYLE SPICY TURKEY PATTIES
[ Gluten-Free / Soy-Free / Dairy-Free / Fleischig]

DOUGH:
1 packet Chebe Pizza Mix (7.5 oz)
3 tbsp coconut oil
3 tbsp coconut milk/coconut cream (full-fat, not low-fat)
1/4 tsp turmeric
1/2 tsp paprika
1 1/2 tsp curry powder
1 egg
Dash of salt
For glaze: 1 egg, well beaten and set aside

MEAT FILLING:
2 tbsp coconut oil or margarine
1 small onion, diced finely
3 cloves garlic
2 tbsp finely minced carrot
1/2 tsp finely minced habanero or scotch bonnet peppers
1 tsp thyme (preferably fresh)
1 lb ground turkey
1 tsp curry powder
1/2 tsp allspice
1 tsp paprika
1 tsp salt
1 tsp ground black pepper
1/2 cup vegetable, turkey or chicken broth
1/2 cup dry gluten-free bread crumbs
Optional: Cayenne powder to taste

Preheat oven to 375 F (190 C).

In a food processor or standing mixer, combine all dry ingredients, pulse until fully blended. Add 3 tbsp coconut oil, egg and coconut milk. Blend until well-combined. Dough should be easily formed into a ball. Wrap ball in saran wrap and refrigerate while you prepare the filling.

Add 2 tbsp coconut oil or margarine to a heavy skillet over medium heat. When the oil is heated, add onions and sautee until translucent. Add garlic, thyme, carrot and minced peppers. Sautee until carrots are slightly tender but garlic has not yet started browning. Add ground turkey and all spices. Using spatula to break meat up into small pieces, allow turkey to brown slightly but not cook through fully. Add breadcrumbs and broth. Stir well, turn heat to low, cover skillet, and simmer for 3-5 minutes while the breadcrumbs soften and absorb moisture and the turkey finishes cooking. If there is still a lot of liquid in the skillet, add a small additional amount of bread crumbs to absorb it. Taste and adjust spices accordingly. Remove from heat.

Unwrap refrigerated ball of dough. Use a rolling pin to roll it out to about 1/8 inch. Fold it over itself and roll again. Repeat this process several times, folding the dough up into layers and then rolling. Finally, roll dough out until it is 1/8 inch in thickness. Cut dough to desired size - A 6" diameter bowl will work if you want to make empanada-shaped half-crescents (or double them up on top of each other to make circular patties). A dough cutter works for cutting out rectangles that can be folded over to make smaller rectangular patties. Using a pastry scraper, move dough shapes carefully to a greased baking sheet. Remove 2 tablespoons of meat from skillet at a time, compressing with your fingers to create a dense "patty". Place meat slightly off-center in the dough shapes, making sure none of the filling reaches the edges of the dough. Fold edge of dough over and use a fork to seal the edges thoroughly. Make sure there are no holes in the dough - If there are, use a moistened finger or small bits of dough to repair them. Brush each patty lightly with beaten egg you've set aside.

Bake at 375 for 20 minutes or until each patty is golden-brown. Serve while hot. Patties can be refrigerated for several days, and warmed in a toaster oven or conventional oven at 200 F.

Friday, August 24, 2007

Totally-Not-Weekly Gluten-Free Recipe Roundup: 8/22/07

Writing this recipe round-up has made Randy Travis' song "Too Gone for Too Long" play on a loop in my head. I hope I haven't been too gone for too long to make a comeback with another episode of the Semi-Weekly (Ha!) Gluten-Free Recipe Roundup. Forgive me for dropping the ball - And many thanks to Seamaiden for picking up the slack. I'd like to draw everyone's attention to her beautiful and innovative Buckwheat Crepes with Lowfat Creamy Mushroom Filling - They are a great example of innovation in presentation, and they are nutritious, to boot. The weather has cooled down enough for me to get excited about cooking and baking again, and I have some time on my hands before school craziness begins, so I thought I'd give you a taste of the most intriguing gluten-free recipes on the blogosphere. By the way, if you're wondering what that picture is... It's itty bitty baby Romeo carrots. I was thinning my carrots and these are the "thinnings" - Candy-sized carrots that are sweet as can be. The big ones are might tasty, too.
Disclaimer: As usual, there are recipes on here that call for ingredients that can be found in both gluten-free and gluten-laden versions (soy sauce, breadcrumbs, etc). There are also ingredients that can be found in kosher and non-kosher versions (and of course milchig and fleishig and pareve). I haven't checked over every ingredient list with a fine-toothed comb, so be sure to check labels, and be creative!

Bon appetit.

Wednesday, August 22, 2007

8 Random Facts About Me

Seamaiden of Book of Yum recently tagged me to do a meme called 8 Random Facts. And by "recently" I mean "almost a month ago", but we all know what a slacker of a blogger I have been this summer! I don't usually do memes but this one looks fun so here goes.

The rules for this meme are:

1. Let others know who tagged you.
2. Players start with 8 random facts about themselves.
3. Those who are tagged should post these rules and their 8 random facts.
4. Players should tag 8 other people and notify them they have been tagged [I've tagged only 5, because I'm a rule-breaker like that.]

Eight Random Facts About Me

1) I have had a lot of jobs, and they are every bit as varied as my personality and my interests. Among other things I have worked as a prep cook, a soda jerk, a UPS airplane loader, calendar editor for a magazine, a warehouse manager, an adult toy salesperson (ahem), an administrative assistant, a leather-cutter and a railroad conductor.

2) The past few months I've been having a love affair with the area where I grew up and recently returned after my 10 year self-imposed exile.

3) I drive a purple car. I like to call the color "eggplant", and it does look black at first glance, but really it is purple. And kind of sparkly. It is the first car I have ever owned.

4) At any given time I have about 5 different business plans stewing in my brain.

5) I want to have a big Jewish family with a whole slew of kids.

6) I cannot understand why people live with animals. I am allergic to cats and many dogs, and the idea of sharing my living space with a non-human mammal makes me shudder. However, I love farm animals and wildlife.

7) I really love pickles, a whole lot. But only sour pickles - The more sour the better. Sour dills, sour garlics, they are all good to me. Pickled veggies, too. But sweet pickles offend me on every level. When I was in high school, before I had to worry about things like heartburn, when I went out with friends at night it was usually to the diner (the only 24-hour place in town), where I would order a whole plate of pickles and an orange soda. Yes, I have always eaten like a pregnant woman. I also find eating sour and salty foods like pickles and olives helps me with sugar cravings.

8) I have just become an honest-to-goodness college student for the first time in eight years. I am doing the prerequisites to (G-d willing) transfer into a program to become a Registered Dietitian or a Nutrition Educator.

And if I were to be allowed a ninth thing, it would be that I think/hope many of you are going to be pretty excited about the next recipe I'll be posting!

I tag:

Gluten-Free [Etc] Goddess
Please Don't Pass the Nuts
Gluten-A-Go-Go
Gluten-Free Gastro-Gnome
My Basement Years

Tag, you're it! [But I promise not to take it personally if you don't want to join in]

Sunday, August 19, 2007

Un-Cooking: Garlic Scape & Toasted Pumpkin Seed Pesto


Dear readers, please forgive my seasonal inappropriateness.

I tend to eat, and blog, both seasonally and locally as much as possible. My recipes reflect that. This pesto is something I made back in early July. I wrote the recipe down and photographed it, but never did anything with it. Today I was daydreaming about this pesto's delightfully complex balance between the sharpness and sweetness of garlic scapes and the nutty comfort of toasted pumpkin seeds (pepitas), and I realized that though garlic scapes are now out of season (June is the prime month for them in most places), I should blog about this recipe before I lose the envelope it's scrawled on. So I hope you'll pardon me for blogging about a delicacy you can't obtain. See this as a reminder that as summer starts to wind down it is a perfect time to start thinking about what we look forward to cooking next spring and summer, or use it as an impetus for some of you gardeners to consider adding garlic to your garden plans for next year!

Since most of us don't follow recipes without tweaking them a bit, it occurred to me that this recipe could be a great jumping-off point for some experimentation. Maybe this recipe would be fabulous with lightly sauteed scallions and/or roasted garlic instead of scapes. Or with lightly steamed green beans pureed into the pesto with raw garlic. I can imagine that roasted leeks would also be a wonderful replacement for scapes. As far as I'm concerned, finding replacements for seasonal ingredients is always an enjoyable challenge.

"What is a garlic scape?" ask the uninitiated, whose ranks I was a member of until this year. Why, I couldn't explain it any better than this Washington Post blogger, who writes:
The "scape" in question is hardly a typo or a secret code word; it's shorthand for garlic scape, a part of the garlic plant that is a garlic lover's nirvana.

Here's the anatomy lesson: Garlic and its relatives in the allium family, (leeks, chives, onions) grows underground, where the bulb begins its journey, soft and onion-like. As the bulb gets harder (and more like the garlic we know), a shoot pokes its way through the ground. Chlorophyll-green like a scallion (maybe even greener), the shoot is long and thin and pliable enough to curl into gorgeous tendrils.

This stage of growth is the garlic scape, folks. If left unattended, the scape will harden and transform from green to the familiar opaque white/beige color of garlic peel. Keeping the shoot attached will also curtail further growth of the bulb. So, in an effort to allow the garlic to keep growing, the farmer is getting a two-fer with this edible delectable that cooks are just beginning to discover.

The pesto I created is vegan, and truly has no need for the usual parmesan cheese. It is sharp with garlicky flavor from the scapes, which mellows over time. The nutty flavor of the toasted pumpkin seeds is just wonderful. This pesto can last for quite a while in the refrigerator. Try it tossed with steam vegetables, or mixed with steamed rice or quinoa. Spread it on fish before or after grilling or broiling. Mix it with hot Tinkyada brown rice pasta. Thin it with some additional olive oil and/or water to create a more saucy pesto that can be poured over salad, meat, fish, vegetables or grain dishes. Use it as a sandwich spread, or eat it alone on a crusty piece of bread. This is a versatile alternative to classic basil pesto or my fresh and clean tasting summery Cilantro-Lemon Pesto. I hope that next spring/summer when you see garlic scapes at your local farmers' market you'll remember this recipe and look it up... Or create an even more exciting use for these beautiful green spirals curlicues, and share it with us!


GARLIC SCAPE & TOASTED PUMPKIN SEED PESTO

[ Gluten-Free / Soy-Free / Dairy-Free / Vegan / Pareve ]


3 Tbsp lemon juice
1/2 cup pumpkin seeds, untoasted and unsalted*
Approximately 15 garlic scapes, raw or lightly sauteed
1/2 cup extra virgin olive oil
1/2 tsp sea salt
2 tsp nutritional yeast
Optional: ground black pepper to taste

Place pumpkin seeds in a dry, preheated skillet over medium flame. Stirring frequently, allow pumpkin seeds to toast until they brown slightly. They will puff up and start popping. Remove immediately from heat and pour into a bowl. Allow them to come to room temperature.

Cut scapes into 2 inch pieces. Add all ingredients to food processor and blend until smooth. Add warm water or additional olive oil to thin, if desired.

*Note: If you use pumpkin seeds that you removed from a pumpkin yourself (as opposed to pre-packaged, dry pumpkin seeds), you may want to try this method for preparing them.

This recipe is part of the Weekend Herb Blogging event, hosted this coming week by Real Epicurean.

Sunday, July 29, 2007

Low-Fat Sugar-Free Sesame Banana Muffins / Sesame Banana Bread


gluten-free sesame banana loaf
I baked up an adapted version of the Sesame Banana Mini-Muffins my parents ate while staying at Poetry Ridge Bed and Breakfast in Greenfield, MA. They came back from their stay with the recipe, written in pencil on an index card. The muffins had apparently been made by the proprietors for another guest, who had multiple food allergies. They both raved about them, so I told them I'd give the recipe a shot despite my skepticism.

The original recipe called for Splenda. Those of you who've been reading this blog for a while know that I don't usually go for artificial sweeteners. Don't kid yourself into thinking that Splenda is any more natural than any other artificial sweetener - It's not. But since I wanted to duplicate the recipe my parents had eaten as closely as possible, I decided to give Splenda a shot. The verdict? The muffins were good, and the loaf was even better, but I won't be baking with Splenda again. Unlike some people, I can detect quite an unpleasant aftertaste. I'll stick to agave nectar and its ilk - Natural sweeteners that are not sugar-free but are lower-glycemic than cane sugar and not over-processed. However, no one else who ate them complained about the Splenda taste so I think I must just have freakish taste buds.

The sesame seeds in this recipe give a delightfully unusual texture to what would otherwise be banana bread (or banana muffins). I used untoasted sesame seeds - But I have called for toasted sesame seeds in the recipe since I believe that lightly toasted sesame seeds would improve the flavor and texture. For the gluten-free flour the recipe calls for, any mix that contains xanthan or guar gum will work, such as Pamela's Ultimate Pancake & Baking Mix or Bob's Red Mill Wheat Free Biscuit & Baking Mix or my cake flour mix recipe.

These muffins have a wonderfully moist texture - Yet they are also low-fat in addition to being sugar-free, which make them a good option for people who are on restricted diets. The quinoa flakes also increase the protein content quite a bit. You can easily replace the sour cream with Tofutti soy sour cream and the milk with soy or rice milk if you'd like to make these muffins dairy-free / pareve. They taste great at room temperature for several days, too. I poured the batter in both a silicone mini-muffin pan and a standard-sized tin bread pan. I enjoyed the cuteness and convenience factor of the mini-muffins, but the loaf took a slight lead when it came to taste and texture. This recipe makes enough batter to fill one mini-muffin pan and one bread pan, so you don't have to choose between the two!

LOW-FAT SUGAR-FREE SESAME BANANA MUFFINS / SESAME BANANA BREAD

[ Gluten-Free / Nut-Free / Soy-Free or Dairy-Free / Milchig or Pareve]

3/4 cups low-fat sour cream or Tofutti soy sour cream
1/2 cup Splenda
2 egg whites
2 bananas, thoroughly mashed
1 tsp vanilla
1 cup Ancient Harvest Quinoa Flakes Hot Cereal
1 cup gluten-free flour mix
1 tsp baking soda
1 cup toasted sesame seeds
1/2 tsp pumpkin pie spice (or 1/2 tsp cinnamon and a pinch of nutmeg)
3/4 tsp salt
1/3 cup low-fat milk or soy / rice milk

Cream Splenda and sour cream with electric hand-mixer. Mix in egg whites, bananas, vanilla. In a separate bowl mix together flour, quinoa flakes, sesame seeds, baking soda and salt. Add to batter and mix well. Pour into greased mini-muffin tins, filling each cup to the top, and/or pour into well-greased bread pan, filling to 1 inch below top. Bake muffins for 15-20 minutes and bake loaf for 35-45 minutes, or until toothpick comes out clean.

Sunday, July 15, 2007

Cooking for Karina: The Recipe Roundup

When fellow food-blogger Karina of Gluten-Free Goddess was diagnosed with a litany of food allergies in addition to celiac disease, she felt overwhelmed. To give Karina a hand in figuring out what she can eat now that she has all these food limitations, I sent a call out for participants in a Cooking for Karina food blogging event. The goal of this event was to create recipes that Karina can eat. This meant avoiding the following ingredients: Cow's milk, cheese, whey, casein, goat's milk, eggs, chicken, turkey, gluten (that includes wheat, barley, rye, spelt, kamut - and oats, to play on the safe side), peanuts, almonds, walnuts, sunflower seeds, soybeans, lemon, avocado, pineapple, papaya, green beans and kidney beans. A great variety of mouth-watering submissions poured in from all over the blogosphere (and all over the globe). I hope this is helpful for those of you who are struggling with multiple food sensitivities and allergies, and maybe even those of you who aren't. Dig in!

Ever the ally to those with dietary limitations, Kalyn of Kalyn's Kitchen crafted a wonderful raw recipe for Zucchini Salad with Tomato and Basil. (Photo above is courtesy of Kalyn.)

Meatballs a la Husband is a meaty contribution from Gluten Freedom.

Gluten-a-Go-Go isn't afraid to turn on the oven in the middle of summer, and baked up a wonderful gluten-free, dairy-free and egg-free Olive Bread.

Lucy at the United Kingdom's Free From Blog cooked Karina some BlackEyed Bean Cakes with Ginger Onion Marmalade.

My own hot-weather contribution is Arugula Salad with Toasted Pumpkin Seeds & Grapefruit-Miso Dressing, made with fresh arugula picked from my garden. Use soy-free chickpea miso if you are allergic to soy.

Book of Yum is always out-yumming itself, this time with a two-course meal, Grilled Sesame Vegetables and Organic Farmer’s Market Fruit and Cashew Vanilla Cream

Peach Crisp for Karina is Sure Foods Living's offering to the Gluten-Free Goddess.

We'd go back to school in a minute for Gluten-Free Cooking School's easy vegetarian Vegetable Gumbo.

Wheat-Free, Meat-Free created a beautiful and vibrant Green Goddess Saute.

Sugar Delirium sent in a recipe for a fresh and colorful Quinoa with Tomatoes and Zucchini.

Coconut Rice with Mango would make a great breakfast in addition to being a delicious dessert. Thanks Mrs. GF!

TriniGourmet's inspired creation is a Carrot, Ginger and Cumin Salad.

The Chocolate Lady of In Mol Araan created a truly delicious looking non-traditional twist on a Jewish classic: Zucchini Hemp Seed Latkes.

If anyone knows about living with food allergies, it's AllergicGirl, who whipped up an Allergic Girl Variation on Burger Salad.

Italy's Lucullian Delights wins the prize for innovation in food presentation for her Zucchini Embraced Eggplant, Zucchini and Grilled Pepper Dice with Capers.

Smart & Tasty Kefir Power Smoothie is made with dairy-free coconut kefir to give you a shot of those much-needed probiotics. Thanks to CeliacChicks for this beverage creation.

Instead of creating a new recipe, A Veggie Venture dug through their archives to find not one but dozens of Karina-friendly recipes!

Freshtopia served up a beautiful raw Vegan Alfredo with Marinated Spagini. They also posted this companion instructional video:


Edited to add: Missy of Food-Fan.net lovingly prepared a Provencale Prawn Soup for Karina (apologies to Missy for initially forgetting to include this!)

Karina, you are appreciated and supported by your food blogging community. I hope this roundup serves as a reference you can use when you get that "I can't eat anything!" feeling. This roundup has given its participants an opportunity to focus on the positive - Emphasizing what you/we can eat instead of what is off limits - which has been a useful experience for many of us. Thank you for all of the inspiration you continue to give your food-blogging compatriots and all of your readers!