 I'm recovering from being sick and am struggling to catch up with all my work-work and blogging-work and house-work, so I'm going to skip on the "featured recipe" this week and just hit you with a plain old straightforward list of delicious gluten-free goodies from food blogs far and wide. Enjoy, everybody!
Wednesday, January 31, 2007
Semi-Weekly Gluten-Free Recipe Roundup - 1/31/07
I'm recovering from being sick and am struggling to catch up with all my work-work and blogging-work and house-work, so I'm going to skip on the "featured recipe" this week and just hit you with a plain old straightforward list of delicious gluten-free goodies from food blogs far and wide. Enjoy, everybody!Monday, January 29, 2007
Pecan Rice Pilaf

Today I set out to answer the question:
What is wild rice, anyway?
According to Wikipedia, wild rice is part of the genus Zizania, which is a group of grasses that grow in the shallows of small lakes and ponds. Three varieties are grown in the United States. Wild rice is not a rice at all, but rather the seed of these aquatic grasses.
Almost always sold as a dried whole grain, wild rice is high in protein, the amino acid lysine and dietary fiber, and low in fat. Like true rice, it does not contain gluten. It is also a good source of the minerals potassium and phosphorus, and the vitamins thiamine, riboflavin and niacin. Because commercial, paddy grown wild rice is harder and denser than true rice, it must be cooked longer to become soft enough to be eaten; it generally requires cooking for at least 45-60 minutes in a ratio of wild rice to water of approximately 1 to 3. Because of its comparatively high cost and chewy texture it is often cooked together with true rice, often in a ratio of true rice to wild rice of 8 to 1 or 4 to 1.[Italics are mine, for emphasis]
Wild rice adds a satisfying chewy texture and compelling color contrast to brown or white rice, and is one of my favorite additions to rice pilaf. For this recipe, inspired by a recipe posted by a woman named Bev on a recipe board I frequent, I call for a blend of brown and wild rice. You can blend the rices yourself, using the ratios indicated above, or simply buy a pre-packaged blend of brown and wild rice. Lundberg Family Farms makes several of these mixes, including their Wild and Brown Rice Blend
Sadly, I have no photograph to accompany this colorful pilaf. I hope it speaks highly of the recipe that I ate it all before I had a chance to photograph it!
PECAN RICE PILAF
1 cup brown rice and wild rice mix
2 cups vegetable stock
1 1/2 tablespoons butter, ghee or olive oil
1 medium carrot, peeled and minced
1 stalk celery, minced
1/2 bell pepper, minced (optional)
1/2 cup white mushrooms, minced
1/2 cup toasted pecans, coarsely chopped
Salt & freshly ground black pepper, to taste
Follow the instructions on the package of brown rice-wild rice mix, using a medium-sized sauce pan and replacing the water with vegetable stock. Most mixes will call for 2 cups of liquid for 1 cup of rice. Bring the stock to a boil, add the rice, cover and turn heat to low. Simmer for the indicated amount of time (approximately 50 minutes).
In a 10" skillet, melt the butter or ghee (or heat oil) over medium heat. Add the carrot and peppers and saute for 2-3 minutes. Add celery, mushrooms, and pecans. Saute for about 2 minutes more, stirring frequently. Add the rice and stir until all ingredients are thoroughly combined and evenly hot. Add freshly ground black pepper to taste, and additional salt if necessary. Serve hot. Leftovers can be reheated or eaten as a rice salad at room temperature.
Makes about 6 servings.
Friday, January 26, 2007
The Day My House Became a Pupuseria

The first time I ate a pupusa I was living in San Francisco's Mission District. I discovered that just one block away (at 1142 Valencia Street) was El Majahual Restaurant, a tiny Salvadorean and Colombian restaurant and pupuseria. I was living on a tight budget and at just $1.65 each, pupusas were just about the cheapest and most filling healthy meal I could find. I recall reading an article that said the rule for making a meal of pupusas is "one for a snack, two for lunch, three for dinner." Sounds about right to me. It was easy to fall in love with these thick El Salvadoreño corn tortillas crafted out of masa harina, stuffed with cheese, beans or meat and topped with a spicy cabbage salad known as curtido.
This weekend my house became a pupusa factory. My friend Melanie came over for dinner, and we ate stacks upon stacks of pupusas con curtido de repollo. I filled some with a combination of goat jack cheese and cotija*, while others were stuffed with both cheese and refried beans. We ate them with salsa, curtido, and slices of ripe avocado. I had so much masa (dough) left over that I made more for my breakfast guest the next day... and yet another batch when my aunt and uncle paid me a surprise visit later that afternoon. I made extras for my own dinner the following day, plus a batch for some dear friends. There were pupusas coming out my ears!
Masa harina is the extremely finely ground corn flour that makes a silky dough that can be used for corn tortillas, pupusas, and other Central American delicacies. The manufacturer of Maseca brand masa harina has verified that it is gluten-free and was made in a facility that does not process wheat. Maseca is widely available in the US and is inexpensive. For more information on Central American products that are gluten-free, check out the Celíacos de México blog (it's in Spanish). There are no good substitutes for masa harina - Corn flour is the closest in texture but not a match, and corn meal will give you mealy, greasy, tough results. So stick to the real thing.
Folks who are vegan, lactose intolerant, or casein-free, can omit the cheese and just stuff the pupusas with refried beans. You can serve an army with these recipes, so cut them in half if you're cooking for one or don't want leftovers!

PUPUSAS DE QUESO Y FRIJOLES REFRITOS
5 cups masa harina flour
4 cups water
1 cup canned gluten-free, vegetarian refried beans
1 1/2 cups cotija, grated (or other hard, mild white cheese)
1 1/2 cups monterey jack or other meltable white cheese, grated
Vegetable oil
In a medium bowl, mix the two cheeses together and set aside. Pour masa harina into a large mixing bowl. Pour the water in slowly, kneading with your hands. Add water a tablespoon at a time until the dough forms a cohesive ball. The dough should be dry enough to handle but moist enough that it doesn't crack at the edges when you press down on it. Allow dough to rest for 10 minutes.
Take a small handful of dough and roll it into a ball about the size of an egg or a little smaller. Flatten it between your palms until it is about 1/3 inch thick. For cheese and bean pupusas, put a generous pinch of cheese and a heaping 1/2 teaspoon of refried beans at the center of the disk of dough. For cheese-only pupusas, use more of the cheese. Beans-only pupusas can take about a teaspoon of beans. After placing the filling at the center of the pupusa, fold the edges in carefully until they meet at the top and the filling is completely covered. Roll carefully into a ball again, this time with the filling hidden inside. Now flatten again between your hands until the ball becomes as flat and thin as possible without the filling seeping out (you can perform this step with a tortilla press if you have one). Ideally they should be about 1/4" to 1/2" thick. Repair any holes to make sure no filling is visible.
Brush a griddle or heavy skillet lightly with vegetable oil and place over medium-high heat. Place each pupusa carefully on the hot griddle. Cook 3-4 minutes on each side or until lightly browned and beginning to blister. Serve hot, topped with curtido or salsa. Leftovers can be refrigerated and heated up at 300 degrees in an oven or toaster oven.
CURTIDO DE REPOLLO
1 head green cabbage
1 cup apple cider vinegar or distilled white vinegar
1/2 cup water
1 medium onion
2 large carrots
1 teaspoon salt
2 teaspoons olive oil
1 1/2 teaspoons oregano
1 teaspoon cayenne pepper
1 teaspoon cumin
1 teaspoon brown sugar (optional)
Using a hand-grater or the grater attachment of your food processor, shred cabbage, carrots and onion. Combine all ingredients in a large mixing bowl. Use the back of a wooden spoon to press all the ingredients down so they are submerged in liquid. Allow to rest at room temperature or in the refrigerator for at least 4-6 hours before serving. Serve with pupusas, or as a topping for fish, quesadillas, or black beans. Makes 10-12 servings.
*Edited 3/09 to add: Because I keep kosher more strictly than I did when I originally wrote this post, and I have yet to find cotija or any similar cheese that is hekshered with a reliable kosher certification, I have been making this with just jack cheese now, and it's great. In fact, I think any mild, hard white, meltable cheese will work well.
Thursday, January 25, 2007
Grilled Chipotle-Lime Chicken
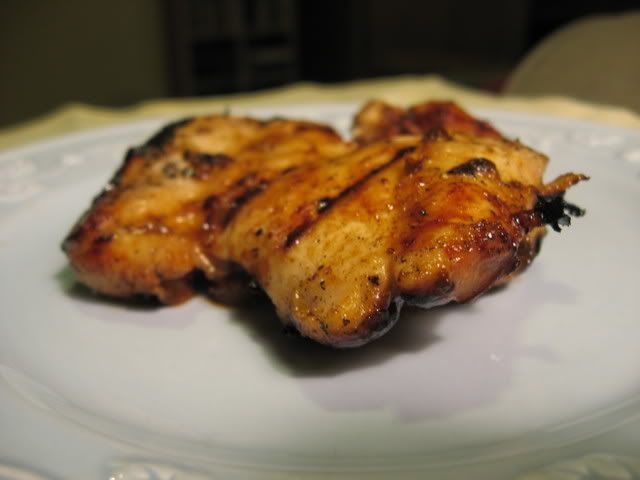
With a few tiny changes to make it spicier, this recipe truly made my taste buds sing. It is such a quick and easy way to prepare flavorful chicken, and the leftovers would be a delicious addition to any taco salad. I am such a big fan of the combination of sweet and spicy flavors - I think they compliment eachother perfectly. It wasn't until I met my ex-partner that I discovered that some people find sweet and spicy to be at odds with eachother, and even repulsive when combined. How do you feel about sweet-and-spicy foods?
GRILLED CHIPOTLE-LIME CHICKEN
1 1/2 lbs boneless skinless chicken breasts, thighs, or leg meat
2 chipotle chiles in adobo, minced
1 teaspoon adobo sauce, from the canned peppers
1/4 cup lime juice
1 garlic clove, minced or pressed
1/4 cup olive oil
2 tablespoons honey
Fresh ground black pepper to taste
If you are using a grill, preheat it to moderate heat for gas or medium indirect heat for charcoal. Away from the fire fire, lightly spray cooking rack with cooking oil.
In a small bowl, mix minced chipotle peppers, adobo sauce, lime juice, garlic, oil and pepper. Pour half into resealable bag. DO NOT add the honey at this point. Reserve the rest of the sauce for basting.
If you're not using kosher chicken (which is saltier), season the chicken with a little salt. Add chicken to bag and allow to marinate for 20 minutes at room temperature.
If you are using a grill pan, grease the pan and then place it over medium-high heat.
Remove chicken from marinade and place on preheated grill or grill-pan. Discard the used marinade.
Grill chicken for about 4-5 minutes, then flip over and cook another 4-5 minutes. Now add the honey to reserved marinade and baste the chicken. Immediately flip chicken and baste the unbasted side. Grill until lightly browned, about 2 minutes. Remove from grill and pour any remaining reserved sauce on top.
Makes approximately 4 servings.
Wednesday, January 24, 2007
Semi-Weekly Gluten-Free Recipe Roundup - 1/24/07
 Dear Readers,
It's here! The latest edition of the Gluten-Free Recipe Roundup, hot off the cyberpresses. I'm happy to include a few new blogs in this week's roundup and lots of tantalizing recipes that even our gluten-eating friends and family will love.
This Week's Featured Recipe:
When Bea of La Tartine Gourmande posted her Potato, Fennel, Pear and Fourme d'Ambert Timbale the blog world, myself included, oohed and ahhed at its glory. Unfortunately many blue cheeses have gluten in them, as they are often started with bread mold, so the timbale recipe needed some tweaking to become suitable for celiacs. Before I got a chance to try to work on it myself, the talented Brilynn of Jumbo Empanadas posted her own beautiful take on Bea's recipe, made with goat's cheese and aged cheddar instead of blue cheese, and adding asparagus for a tasty twist. Her Tater Timbales (see photo) are suitable for those on a gluten-free diet and sure look fantastic!
NOTE: Some of these recipes may call for ingredients that are available in both gluten-containing and gluten-free versions. Some examples of such ingredients include: bouillon cubes, hoisin sauce, fish sauce, soy sauce, chicken broth. As always, please read the labels carefully. When in doubt, contact the manufacturer to ascertain the food's gluten status.
For those who have noticed a suspicious lack of pork and shellfish on these weekly roundups... This is a kosher blog, so all recipes I post or link to are kosher or can easily be adjusted to be kosher. If you have a recipe to submit, please do e-mail me!
Tuesday, January 23, 2007
Maple Butternut Squash Puree

I fretted over the air bubbles that were visible in this photo at the bottom of the bowl until my Official Photography Consultant, M of Poet With A Day Job, pointed out that the bubbles just highlight the fact that this puree was photographed while it was still steaming hot. Phew!
I've discovered that I can eat cow's milk only every 4 days or so. Oddly enough, those fried mozzarella sticks hardly bothered my stomach... yet when I baked something using butter the following day, I got sick as a dog. I need to be more careful not to overload my frustratingly fragile GI system. On that note, I made a delicious dish last night that was buttery and decadent without making me sick. The key? Ghee, that fabulous Indian incarnation of clarified butter that seems to concentrate the dreamy butter flavor while removing the lactose and casein.
There is something about butternut squash that is so alluring this time of year - The vivid color reminds me of the marigolds I love to grow. Here in my Northern California garden last year's marigolds have finally died and this year's marigolds are beginning to sprout.
The taste and texture of butternut squash are so versatile - Cut in large pieces and roasted, mashed as a side dish, pureed for the filling for a tart or ravioli, combined with vegetable stock for a rich and creamy soup. Always delicious. The spicy main dish I made this time around called out for a sweet and lightly spiced side with a creamy texture. Butternut squash puree to the rescue!
Two tablespoons of maple syrup provides plenty of sweetness, but if you want stronger maple flavor you can certainly add more.
MAPLE BUTTERNUT SQUASH PUREE (Lactose-Free, Casein-Free)
1 medium butternut squash
1/4 teaspoon salt
2 tablespoons ghee or clarified butter
2-3 tablespoons maple syrup
2 teaspoons pumpkin pie spice
3 tablespoons rice milk or soy milk or almond milk
Peel squash, cut in half lengthwise, and remove seeds. Cut into 1 1/2 inch cubes and steam until tender. Place steamed butternut squash cubes and all other ingredients in a food processor or blender. Blend until smooth and creamy. Serve hot or warm.
Friday, January 19, 2007
Puy Lentil Salad with Feta
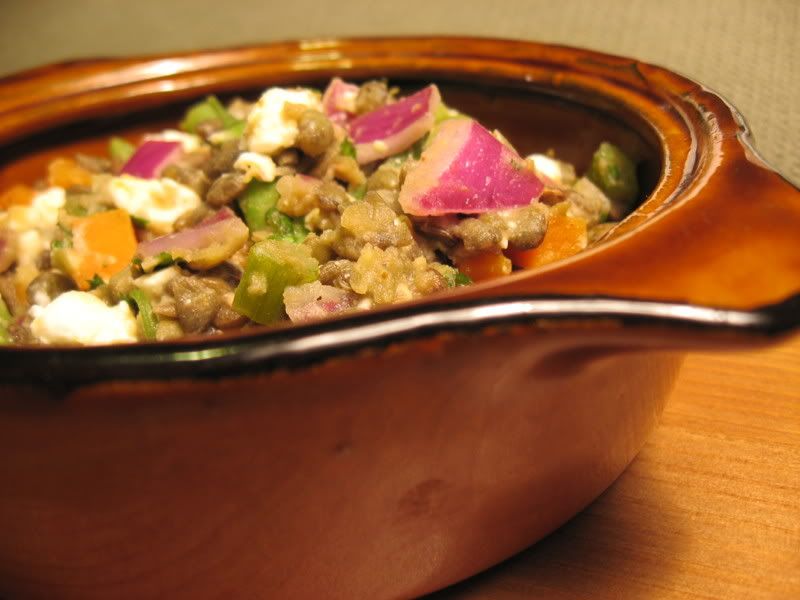
I'm always on the lookout for vegetarian gluten-free recipes that are rich in fiber and protein. This recipe sure meets the requirements, with 11.6 grams of dietary fiber per serving, and 13.6 grams of protein! This is my kosher adaptation of a recipe from user "de Roche" on RecipeZaar - The original called for diced ham.
Puy lentils are a small, flavorful lentil that hold their shape in salads better than brown or red lentils. They are more expensive than other types of lentils but well worth the cost, in my opinion. If you cannot find them, you can substitute beluga lentils, masoor dal, or brown lentils (which won't hold their shape as well as puy lentils). In the picture you can tell that I overcooked them a bit because I forgot to set the kitchen timer... Oops! Thankfully, the salad was still fabulous.
I used Eden Foods' unsweetened Brown Rice Vinegar which is gluten-free, kosher, and organic. You may use a white rice vinegar if that's what you have on hand, and if you prefer you can try one of the "seasoned" rice vinegars which have added sugar.
Use a high quality feta cheese for this salad if you can - It is worth avoiding Athenos or one of the other mass-produced fetas, if possible. I recommend a goat and/or sheep's milk based cheese for the best taste.
PUY LENTIL SALAD WITH FETA
1/2 cup puy lentils
2 bay leaves
1 cup green beans, trimmed and sliced in fourths
1 carrot, peeled and diced
1 stalk celery, diced
2 tablespoons fresh cilantro, finely chopped
1 small red onion, chopped
3 ounces feta, crumbled
2 tablespoons olive oil
2 tablespoons unseasoned rice vinegar
1 teaspoon sea salt
1 teaspoon fresh ground black pepper
Cover the lentils and bay leaves with several inches of water in a saucepan. Bring to a boil, then cover and lower heat. Simmer for 20 minutes or until the lentils are tender. Discard the bay leaf and drain the lentils. Allow them to cool to room temperature.
While the lentils are cooking, chop the beans, carrot, and celery. Steam them for about 5 minutes, or submerge them in boiling water for 1 minutes. They should retain a crisp texture - Do not overcook.
Toss vegetables and lentils together in a bowl. Add cilantro and onion. Combine oil, rice vinegar, salt and pepper. Add dressing to salad and mix well. Stir in crumbled feta right before serving. Serve slightly warm or at room temperature.
Makes 3-4 generous servings.
[Created for Weekend Herb Blogging]
Goat Yogurt from Redwood Hill Farm
 I purchased a 6 ounce container of Redwood Hill Farm's Apricot Mango Goat Milk Yogurt at the Berkeley Farmer's Market this weekend. I had enjoyed the Sebastopol-based creamery's fabulous goat cheeses in the past, including their raw goat's milk feta and their smoked goat cheddar. This yogurt, which is both kosher and gluten-free, intrigued me. I am lactose intolerant and somewhat sensitive to casein, but I seem to digest goat's milk and sheep's milk products far more easily than cow's milk. Redwood Hill Farm's website explains that the fat molecules in goat's milk are more easily digestable than cow's milk, and that due to the lactose and casein in goat's milk being structurally different, many people who can't digest cow's milk are able to eat goat's milk.
The first thing I noticed about the Apricot-Mango Goat Milk Yogurt was that it had the extremely creamy, rich texture and taste that I associate with full-fat yogurt. I checked the label to see if I'd purchased low- or full-fat yogurt and was surprised to see that there were actually only 3 grams of fat per serving, though the yogurt is made with whole milk.
Goat's milk yogurt has a distinctive flavor - There is certainly something slightly "goaty" about it- A grassy, slightly gamey flavor which some people will enjoy and others might find unappealing. However, with the addition of fruit, I found the taste deeper and more sophisticated than the taste of regular yogurt but still very pleasant. The fruit on the bottom was not oversweetened, as no additional sugar is added to their products.
I am looking forward to purchasing the plain yogurt in the future, for use in fruit smoothies or Indian dishes. I can't imagine enjoying it alone without the addition of fruit or other flavors, but it is great to know that there is a yogurt I can use in my cooking that won't make me sick.
To find Redwood Hill Farm's yogurts and cheeses near you, use their store locator. They sell their products nationwide. You can also order bulk quantities through their online store.
Subscribe to:
Posts (Atom)


